
Jolly Jumper (product instructions)
Jolly Jumper with Stand
Other information and tips

Other information and tips
- If door frames measurements are not suitable, the Jolly Jumper could be used on:
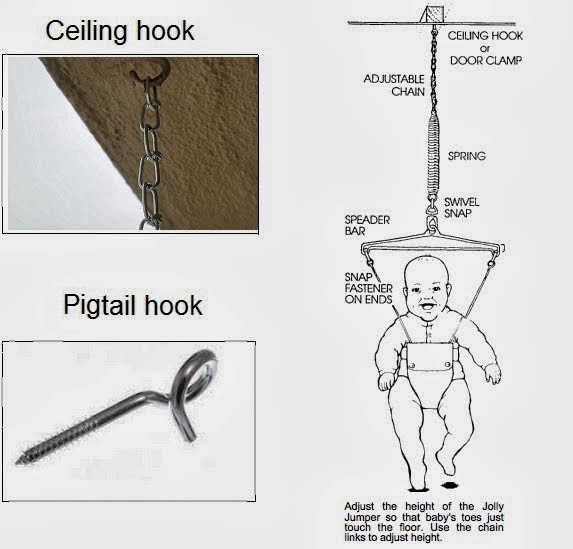
- a ceiling/pigtail hook. Pick a spot where child will be free to maneuver a meter or so in all directions. Ensure that the hook is screwed to a ceiling joist. Be sure to test the hook with adult weight. Do not trust thin wood or wall board. With the hooks, the Jolly Jumper with door clamp can also be used outdoors - car porch/verandah.
(With the hooks, the Jolly Jumper with door clamp can also be used outdoors - car porch/verandah)
Note: The chain may not be long enough to hang from the ceiling (depending on your ceiling height). Alternatively, you could purchase a chain from the hardware store to replace the adjustsable chain. It is advisable to connect the chain from the spring to the ceiling hook.
- Jolly Jumper with Door Clamp could also be easily put in the over lock position and used on a sturdy tree in the garden.
- Remember to bring your Jolly Jumper with Stand to Grandpa's, holiday trips or to a picnic!
- The toes of your baby should be just touching the floor in order to get maximum control of the jumper.
- Tie a balloon on your Jumper cradle so that baby can have lots of fun learning to play with a colorful moving object.
- Another fun activity is to get a blow-up wadding pool and place about 4" of water in it. Suspend Jolly Jumper over the pool and your baby can have lots of fun kicking and splashing in the water.
- It is advisable not to place Jolly Jumper near open stairways, or on a concrete surface. Adding a mat, or on a carpeted area can help babies jump comfortably.


